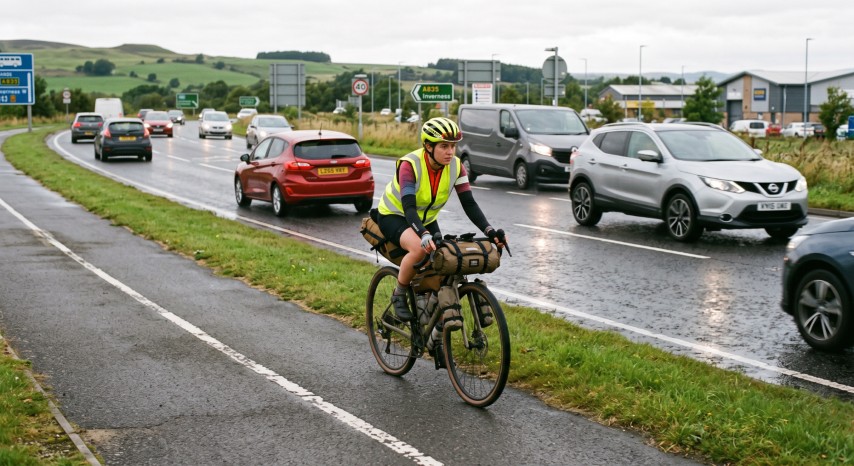
The Kiwi Rim Ride is on public roads so riders carry a risk of crashes with vehicles. Since the goal is to circumnavigate New Zealand on the outermost roads, there are often limited options which means you will be sharing the road with heavy traffic.
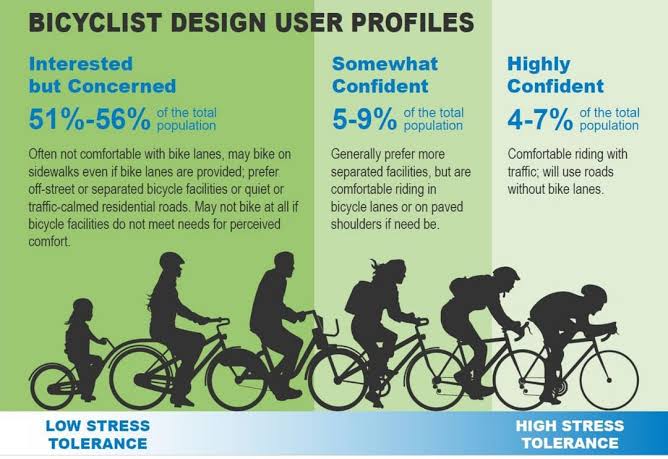
If you are not comfortable riding with traffic the Kiwi Rim Ride is not for you. To do the Kiwi Rim Ride you to the right of the 'Highly Confident' riders...
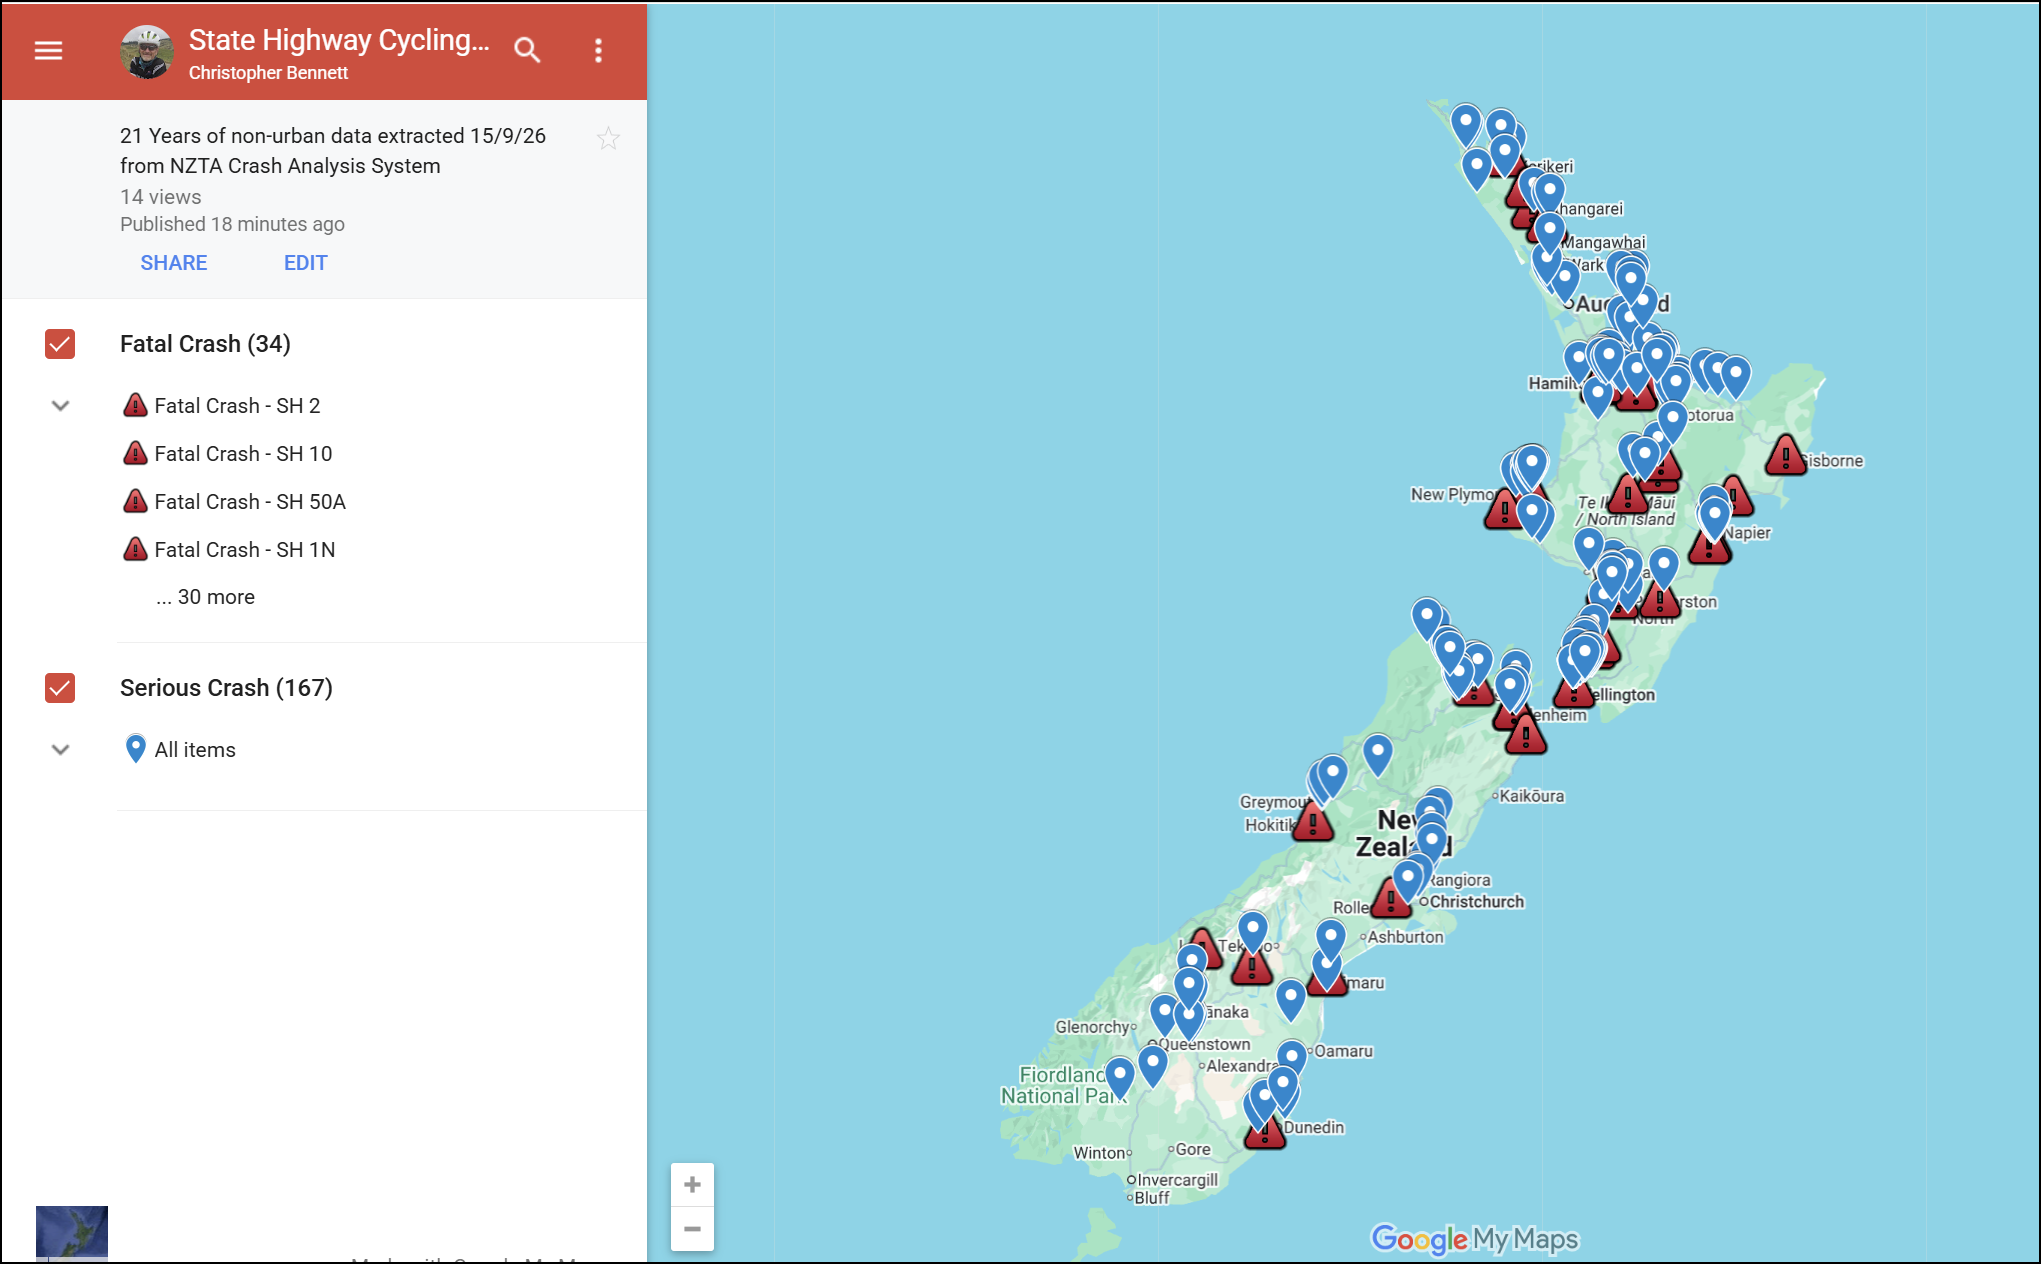
To better illustrate the risks, below is a map created from the NZTA Crash Analysis System (CAS) database. It shows the fatalities and serious injuries over 21 years (2006 - 2026) on the State Highways outside of urban areas. There were 34 fatalities and 167 serious injuries, just under 10 per year. Click on the image below and you can drill down into the data.
To help mitigate the risks, we have used paved local roads instead of State Highways wherever practicable. Since these have lower volumes the risk is lower, however, this can be offset by the absence of shoulders. For this reason we recommend you ride with a radar unit such as a Garmin Varia, Magene L508 or Lezyne. These have been found to be the most reliable by independent testers.
Below is a (non-exhaustive) assessment of the key road safety risks along the routes focused on the state highways.
Important Notice & Disclaimer: Route Safety & Risk Assessments
The route descriptions, hazard assessments, traffic notes, and safety guidance provided on this website are compiled solely for general informational and route planning purposes for participants.
Non-Exhaustive Assessment: Road conditions, traffic volumes, weather patterns, and hazards in New Zealand are inherently dynamic and subject to rapid change. This risk assessment is not exhaustive and cannot account for every potential danger, road defect, environmental hazard, or traffic situation that participants may encounter.
Limitation of Liability: Event organizers, route planners, and contributors accept no liability or responsibility whatsoever for any errors, inaccuracies, or omissions in these assessments, nor for any loss, damage, injury, or accident arising directly or indirectly from reliance on this information. Participants remain solely responsible at all times for their own safety, road rule compliance, situational awareness, and equipment suitability.
Key Rider Road Safety Risk Mitigation Strategies
- High Visibility Vests: Wear a high visibility vest or harness at all times.
- Active Rear Radar / High-Lumen Flashing Lights: Garmin Varia/Magene L508 radar or equivalent high-candela daytime rear flashers are strongly recommended for early warning of approaching heavy trucks on narrow highways.
- Single-File Discipline: Always ride strictly single file on State Highways (at least 3 bike lengths apart so as not to draft), blind bends, or where road shoulder width is under 1 metre.
- Bridge Priority Courtesy: On one-lane bridges, yield to heavy trucks even if road signs indicate you have priority, as heavy rigs require significant stopping distance.
- Turbulence Preparation: Hold handlebars firmly when 50-tonne B-train or logging rigs pass in opposite or same direction due to air displacement.
Last updated: 22 September 2026
Kiwi Rim Ride – North Island Heavy Traffic & Heavy Vehicle Hazards
Route Advisory & Safety Assessment for Ultra-Endurance Cyclists
Scope: Sequential identification of key road corridors with elevated heavy vehicle (logging, stock transport, freight, quarry) volume, narrow shoulders, or blind winding terrain.
1. Wairarapa, Hawke's Bay & Gisborne Corridor (Heading North-East)
SH2 & Route 52 Martinborough / Masterton / Pongaroa Corridor
- Traffic Density: Remote rural roading with heavy seasonal stock trucks, wool/grain freight, and forestry extraction units.
- Road Hazards: Narrow inland seals, gravel spray on corners, slump repairs, and blind hill crests.
- Rider Guidance: Stay left on all blind hill crests; carry dual high-visibility rear lights for rural open road safety.
SH2 Napier to Wairoa & Gisborne Corridor
- Traffic Density: Extremely high density of 50-tonne log trucks travelling to Napier Port and Gisborne Port.
- Road Hazards: Steep gorges (Wharerata Hills / Mohaka), narrow windy descents, minimal shoulder, ongoing road recovery works.
- Rider Guidance: Avoid night/dawn riding in gorge sections; pull into slow-vehicle turnout bays to clear queues of trailing heavy trucks.
2. East Cape, Bay of Plenty & Coromandel Peninsula
SH35 / SH2 East Cape to Ōpōtiki & Bay of Plenty
- Traffic Density: Dense port-bound container traffic near Tauranga/Mt Maunganui; continuous logging and kiwifruit transport into Ōpōtiki/Gisborne.
- Road Hazards: SH35 East Cape has narrow remote seal, unpaved shoulder edges, roaming stock, and high-speed log transport with limited sightlines.
- Rider Guidance: Mount high-lumen rear flashing lights; expect heavy log trucks around every bend on SH35.
SH2 & SH25 Waihī to Coromandel Peninsula Corridor
- Traffic Density: Moderate freight mixed with high-volume tourist campervans, boat trailers, and local timber/quarry haulers.
- Road Hazards: Narrow winding coastal roads with single-lane bridges, rock drop-offs, and zero shoulder in seawall sections.
- Rider Guidance: Exercise extreme caution on blind coastal corners; check bridge priority signs and yields before entry.
3. Northland Forestry & Far North Transit
SH1 / SH14 Whangārei & Northland Forestry Link
- Traffic Density: Continuous logging truck traffic feeding Marsden Point and local processing mills from West Coast and Northland forests.
- Road Hazards: Rough, chip-seal surface, soft or non-existent gravel shoulders, and sharp blind bends along rural forest cuts.
- Rider Guidance: Keep single-file as far left as safely practicable; avoid riding during early morning log transport shifts.
4. Auckland Approaches & King Country Corridor (Heading South along West Coast)
Auckland Arterial Approaches & Airport Transit
- Traffic Density: Extreme urban freight traffic, container haulers around South Auckland logistics hubs, and intense commuter flows.
- Road Hazards: Multi-lane arterial roundabouts, tight turn radii, and blind spots around truck cabs and trailers.
- Rider Guidance: Avoid weekday morning and afternoon peak windows (07:00–09:00 & 16:00–18:30); claim the lane early at roundabouts to avoid squeeze-outs.
SH30 & SH3 Ōtorohanga to Te Kuiti Corridor
- Traffic Density: Heavy concentration of log haulers from King Country forestry and limestone/quarry transport.
- Road Hazards: Narrow two-lane road with minimal shoulder, winding terrain through cuttings, wet road spray in shade.
- Rider Guidance: Be prepared for heavy vehicle wind draft/buffeting when passed; listen carefully for trailing trucks on climbs.
5. Taranaki, Manawatu & Wellington Return
SH3 Hāwera to Whanganui Corridor
- Traffic Density: High volume of milk tankers (Fonterra), livestock trucks, and inter-regional freight connecting Taranaki to Manawatū.
- Road Hazards: Rolling hills with limited shoulder width, high closing speeds, and heavy crosswinds across rural farmland.
- Rider Guidance: Stay alert for milk tanker turns at rural collection points; take shoulder space where paved, maintain high visibility.
SH1 / SH59 Levin & Ōtaki to Wellington Approach
- Traffic Density: Heavy multi-lane freight corridors carrying all North/South Island inter-island ferry logistics and regional freight.
- Road Hazards: Narrow shoulders along older highway sections, high-speed multi-lane merge zones, and severe crosswinds along Kapiti Coast.
- Rider Guidance: Use daylight flashing rear radar/lights, avoid peak morning/evening commuters, and maintain defensive single-file riding.
Kiwi Rim Ride – South Island Heavy Traffic & Heavy Vehicle Hazards
Route Advisory & Safety Assessment for Ultra-Endurance Cyclists
1. Marlborough, Rai Valley & Tasman Approaches (Heading West)
SH6 Havelock through Rai Valley to Whangamoa Saddle & Nelson
- Traffic Density: Key inter-regional arterial carrying heavy freight and logging trucks between Blenheim/Picton and Port Nelson.
- Road Hazards: Very narrow, twisting climbs over Rai Saddle and Whangamoa Saddle with minimal shoulder width, blind S-bends, drop-offs, and wet shaded chip-seal.
- Rider Guidance: Maintain active rear radar; use turnout bays on climbs to clear queues of trailing heavy trucks, and exercise extreme caution on narrow descents.
SH6 / SH60 Nelson & Richmond Urban Arterial, Motueka
- Traffic Density: High seasonal fruit/hop transport, logging haulage from Golden Downs, and heavy urban freight servicing Nelson industrial zones.
- Road Hazards: Busy multi-lane roundabouts around Nelson and Richmond with tight coastal seawall segments.
- Rider Guidance: Avoid weekday peak commuter hours around Richmond/Nelson; claim lane position early at major roundabouts.
2. West Coast & Mountain Passes Corridor (Heading South)
SH6 Buller Gorge to Greymouth, Hokitika & Haast Pass
- Traffic Density: Heavy continuous log haulage, Fonterra milk tankers, and coal/mineral transport operating along the narrow West Coast corridor.
- Road Hazards: Narrow single-lane bridges, rock overhangs in Buller Gorge, wet shaded asphalt, and zero shoulder margin.
- Rider Guidance: Check single-lane bridge sightlines early; yield to heavy trucks even if holding formal right-of-way.
3. Southern Lakes & Southland Corridor (Heading South-East)
SH6 / SH94 Wanaka, Queenstown, Te Anau & Southland Trunk
- Traffic Density: Mix of tour coaches, seasonal livestock transport, dairy tankers servicing Southland processing plants, and rental vehicles.
- Road Hazards: Winding cliff-side alignment along Devil's Staircase, high crosswinds across Southland plains, and fast-moving freight.
- Rider Guidance: Use slow-vehicle turnout bays when trailing traffic builds up; maintain a wide margin from road edge drop-offs.
4. East Coast Main Arterials (Heading North)
SH1 Dunedin through Oamaru & Timaru to Christchurch
- Traffic Density: Highest heavy vehicle volume in the South Island, carrying long-haul container trucks, inter-city freight, and stock units.
- Road Hazards: High-speed 100 km/h traffic, narrow bridges across Canterbury rivers, rough chip-seal shoulders, and heavy air turbulence from passing rigs.
- Rider Guidance: Maintain strict single-file riding with dual high-visibility rear flashers.
5. Marlborough Return & Ferry Approach (Ending Corridor)
SH1 Blenheim to Picton Ferry Corridor
- Traffic Density: Concentrated, high-speed platoons of heavy B-train freight trucks and inter-island transport following ferry arrivals and departures at Picton Port.
- Road Hazards: Narrow shoulders over Elevation Pass, high closing speeds, and heavy vehicle queues exiting/entering the ferry terminal.
- Rider Guidance: Time your final leg to avoid inter-island ferry arrival/departure windows; stay alert for fast-moving platoons exiting Blenheim or Picton.
PICTON FERRY TRAFFIC
Heading north towards Picton the traffic flows are heavily governed by ferry traffic, and this is particularly true for heavy-vehicles.
The busiest times are Tuesday Night through Thursday night. Freight volumes peak mid-week to align with nationwide supply-chain freight cycles. Monday mornings and weekend days generally experience the lightest heavy-vehicle traffic.
Freight vehicles must check in at least 60 minutes prior to sailing. Heavy northbound truck activity peaks on SH1 into Picton leading into major scheduled sailings (Interislander and Bluebridge), particularly ahead of early morning (around 5:00 AM – 7:30 AM), mid-afternoon (1:00 PM – 3:30 PM), and evening departures.